
Build your first agent with Microsoft Copilot Studio

Building

Copilot Studio is a powerful tool within the Microsoft ecosystem designed to help users create and manage AI-driven agents. It provides a user-friendly interface and a suite of features that make it easy to build, customize, and deploy conversational agents. Whether you're looking to enhance customer support, integrate chat functionality into your applications, or create interactive experiences, Copilot Studio offers the tools you need.
What You’ll Learn in This Guide
- What Copilot Studio is and how it fits into the Microsoft ecosystem
- Key features and use cases for building AI agents
- Pricing models and subscription options
- Step-by-step guide to creating and deploying your first agent
- How to add knowledge sources, topics, and actions
- Tips for testing, publishing, and optimizing your agent
Subscribe now to unlock the full article and gain unlimited access to all premium content.
SubscribeCopilot Studio is a powerful tool within the Microsoft ecosystem designed to help users create and manage AI-driven agents. It provides a user-friendly interface and a suite of features that make it easy to build, customize, and deploy conversational agents. Whether you're looking to enhance customer support, integrate chat functionality into your applications, or create interactive experiences, Copilot Studio offers the tools you need.
What You’ll Learn in This Guide
- What Copilot Studio is and how it fits into the Microsoft ecosystem
- Key features and use cases for building AI agents
- Pricing models and subscription options
- Step-by-step guide to creating and deploying your first agent
- How to add knowledge sources, topics, and actions
- Tips for testing, publishing, and optimizing your agent
How Does Copilot Studio Fit into the Microsoft Ecosystem?
Copilot Studio seamlessly integrates with other Microsoft services, such as Azure, Power Platform, and Microsoft Teams. This integration allows you to leverage the full power of Microsoft's cloud and AI capabilities, ensuring your agents are robust, scalable, and secure. By using Copilot Studio, you can create agents that not only perform well but also align with your broader digital strategy within the Microsoft ecosystem.
What Can You Do with Copilot Studio?
- Build AI-Driven Agents: Create intelligent agents that can handle a variety of tasks, from answering customer queries to providing personalized recommendations.
- Integrate Chat into Applications: Easily add chat functionality to your websites and applications, enhancing user engagement and support.
- Enhance Customer Support: Deploy agents that can assist customers 24/7, improving response times and customer satisfaction.
- Analyze and Improve: Use built-in analytics to monitor agent performance and make data-driven improvements.
- Customize and Scale: Tailor your agents to meet specific needs and scale them as your requirements grow.
This introduction sets the stage for understanding the capabilities and benefits of Copilot Studio, preparing readers for the detailed instructions that follow. Would you like to proceed with the next section on getting started?
Pricing and Plans
To use Copilot Studio, you need a valid Microsoft 365 or Azure subscription. Copilot studio offers plans to best suit and individuals or organization's needs. The Copilot studio is offered in three subscription models :
- Microsoft 365 Copilot Studio: Included with the Microsoft 365 Copilot subscription at $30 per user/month. This plan allows you to create agents that integrate seamlessly with Microsoft 365 Copilot, enhancing productivity and collaboration within the Microsoft 365 ecosystem.
- Microsoft Copilot Studio (Pay-as-you-go): This subscription model requires no upfront commitment. You pay for what you use, enabling you to build and deploy agents across multiple channels. An Azure subscription is needed for billing purposes, providing flexibility and scalability based on your usage.
- Microsoft Copilot Studio ($200/month/tenant): Priced at $200 per month for the organization, this plan includes 25,000 messages per month. It allows you to build your own agents that are available across multiple channels, offering a comprehensive solution for businesses with higher interaction volumes.
How to Create an Agent
Step 1 - Getting Started with Copilot Studio
- To get started, visit copilotstudio.microsoft.com and click on the Sign In button.
Use your Microsoft account credentials to log in, ensure you have the appropriate licensing associated with your account.

- Upon login you will see the main dashboard. You can get started by describing the agent you need in the chat box, or click more to view the templates.

- For this demonstration, we will create a Website QnA bot, so lets select that template. Give the agent a name and description. The instructions are an important step, they provide operating guidelines to bot around tone, personality, depth etc.

Step 2 - Add instructions and starter prompts
- Once you add instructions, you can starter prompts. Starter prompts are in-context suggestions that will be offered to the users interacting with the bot. These could be basic questions about the topic/knowledge source.

- Click save on the starter prompts and click Create on the top left to create your agent.
Step 3 - Adding Knowledge Sources
- Once your agent is create, you can add Knowledge sources. This is data that the agent can work with. This provides the LLM context and data it uses to respond to user questions.

- You can multiple knowledge sources. They can be files, public websites or SharePoint repositories that contain organizational data.

- For Enterprise subscriptions, you have the option to create connectors to a variety of data sources

Step 4 - Add topics and Actions
- Topics are like mini automations that are triggered based on the phrases or keywords the user says. These are use to dictate the agents conversational behavior. For Ex - Escalate to another channel if the user requests to speak to a human.
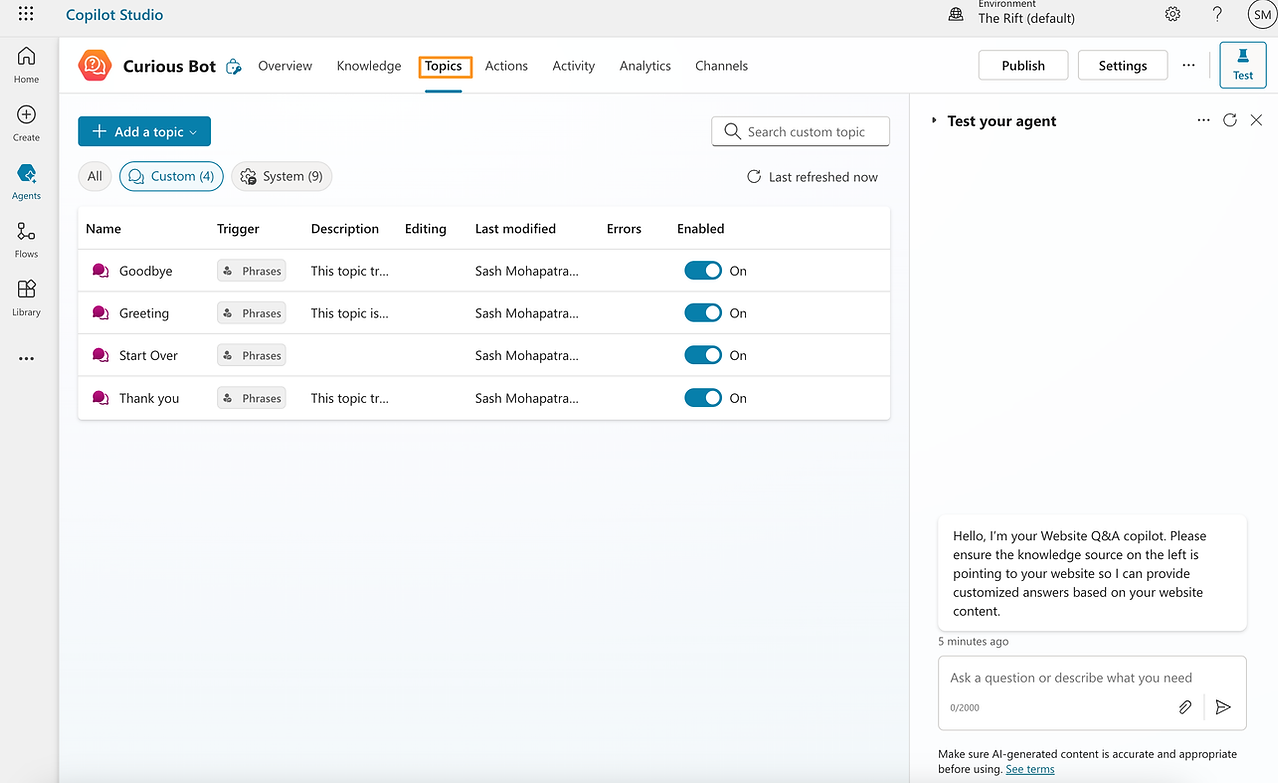
- Actions are actions you'd like for your agent to take, when a certain condition is triggered. These can range from modifying/transforming data to running full fledged workflows.

- You can have the agent modify data or connect to external systems to execute more complex actions. You can also call a PowerAutomate scenario that performs a set of different actions.

Step 5 - Testing and Publishing your agent
- Once you have added the desired settings, test your agent using the chat interface. Ask it questions pertaining your knowledge source. Tweak instructions and data to get the optimal desired tone and result accuracy.

- Once you are satisfied with the testing results, you are ready to Publish. The copilot Studio offers various "channels" for publishing your agent.

- You can publish the agent to your Teams or Slack organization. It can also be published directly to a website.
Pro Tips
- Write clear system instructions: Define the agent’s role, tone, and limits upfront.Test and iterate your instructions to get the best results.
- Use structured, scoped knowledge sources: Keep content clean, relevant, and easy to parse. Update your data sources if they change, especially files.
- Create topics for key tasks: Don’t rely only on AI — use topics to create workflows that will guide your agents behavior.
- Set smart fallbacks: Handle unknowns gracefully with clear responses or handoffs. You can configure fallbacks using Topics or Actions.
- Test and iterate often: Use transcripts and analytics to refine trigger phrases and improve responses.
Wrapping up
Creating an agent in Copilot Studio is all about combining clear intent with smart structure. With solid system instructions, well-organized content, and thoughtful testing, your agent can become a reliable guide for users — answering questions, solving problems, and representing your brand with clarity and confidence.
Copilot Studio is a powerful tool within the Microsoft ecosystem designed to help users create and manage AI-driven agents. It provides a user-friendly interface and a suite of features that make it easy to build, customize, and deploy conversational agents. Whether you're looking to enhance customer support, integrate chat functionality into your applications, or create interactive experiences, Copilot Studio offers the tools you need.
What You’ll Learn in This Guide
- What Copilot Studio is and how it fits into the Microsoft ecosystem
- Key features and use cases for building AI agents
- Pricing models and subscription options
- Step-by-step guide to creating and deploying your first agent
- How to add knowledge sources, topics, and actions
- Tips for testing, publishing, and optimizing your agent
How Does Copilot Studio Fit into the Microsoft Ecosystem?
Copilot Studio seamlessly integrates with other Microsoft services, such as Azure, Power Platform, and Microsoft Teams. This integration allows you to leverage the full power of Microsoft's cloud and AI capabilities, ensuring your agents are robust, scalable, and secure. By using Copilot Studio, you can create agents that not only perform well but also align with your broader digital strategy within the Microsoft ecosystem.
What Can You Do with Copilot Studio?
- Build AI-Driven Agents: Create intelligent agents that can handle a variety of tasks, from answering customer queries to providing personalized recommendations.
- Integrate Chat into Applications: Easily add chat functionality to your websites and applications, enhancing user engagement and support.
- Enhance Customer Support: Deploy agents that can assist customers 24/7, improving response times and customer satisfaction.
- Analyze and Improve: Use built-in analytics to monitor agent performance and make data-driven improvements.
- Customize and Scale: Tailor your agents to meet specific needs and scale them as your requirements grow.
This introduction sets the stage for understanding the capabilities and benefits of Copilot Studio, preparing readers for the detailed instructions that follow. Would you like to proceed with the next section on getting started?
Pricing and Plans
To use Copilot Studio, you need a valid Microsoft 365 or Azure subscription. Copilot studio offers plans to best suit and individuals or organization's needs. The Copilot studio is offered in three subscription models :
- Microsoft 365 Copilot Studio: Included with the Microsoft 365 Copilot subscription at $30 per user/month. This plan allows you to create agents that integrate seamlessly with Microsoft 365 Copilot, enhancing productivity and collaboration within the Microsoft 365 ecosystem.
- Microsoft Copilot Studio (Pay-as-you-go): This subscription model requires no upfront commitment. You pay for what you use, enabling you to build and deploy agents across multiple channels. An Azure subscription is needed for billing purposes, providing flexibility and scalability based on your usage.
- Microsoft Copilot Studio ($200/month/tenant): Priced at $200 per month for the organization, this plan includes 25,000 messages per month. It allows you to build your own agents that are available across multiple channels, offering a comprehensive solution for businesses with higher interaction volumes.
How to Create an Agent
Step 1 - Getting Started with Copilot Studio
- To get started, visit copilotstudio.microsoft.com and click on the Sign In button.
Use your Microsoft account credentials to log in, ensure you have the appropriate licensing associated with your account.
- Upon login you will see the main dashboard. You can get started by describing the agent you need in the chat box, or click more to view the templates.
- For this demonstration, we will create a Website QnA bot, so lets select that template. Give the agent a name and description. The instructions are an important step, they provide operating guidelines to bot around tone, personality, depth etc.
Step 2 - Add instructions and starter prompts
- Once you add instructions, you can starter prompts. Starter prompts are in-context suggestions that will be offered to the users interacting with the bot. These could be basic questions about the topic/knowledge source.
- Click save on the starter prompts and click Create on the top left to create your agent.
Step 3 - Adding Knowledge Sources
- Once your agent is create, you can add Knowledge sources. This is data that the agent can work with. This provides the LLM context and data it uses to respond to user questions.
- You can multiple knowledge sources. They can be files, public websites or SharePoint repositories that contain organizational data.
- For Enterprise subscriptions, you have the option to create connectors to a variety of data sources
Step 4 - Add topics and Actions
- Topics are like mini automations that are triggered based on the phrases or keywords the user says. These are use to dictate the agents conversational behavior. For Ex - Escalate to another channel if the user requests to speak to a human.
- Actions are actions you'd like for your agent to take, when a certain condition is triggered. These can range from modifying/transforming data to running full fledged workflows.
- You can have the agent modify data or connect to external systems to execute more complex actions. You can also call a PowerAutomate scenario that performs a set of different actions.
Step 5 - Testing and Publishing your agent
- Once you have added the desired settings, test your agent using the chat interface. Ask it questions pertaining your knowledge source. Tweak instructions and data to get the optimal desired tone and result accuracy.
- Once you are satisfied with the testing results, you are ready to Publish. The copilot Studio offers various "channels" for publishing your agent.
- You can publish the agent to your Teams or Slack organization. It can also be published directly to a website.
Pro Tips
- Write clear system instructions: Define the agent’s role, tone, and limits upfront.Test and iterate your instructions to get the best results.
- Use structured, scoped knowledge sources: Keep content clean, relevant, and easy to parse. Update your data sources if they change, especially files.
- Create topics for key tasks: Don’t rely only on AI — use topics to create workflows that will guide your agents behavior.
- Set smart fallbacks: Handle unknowns gracefully with clear responses or handoffs. You can configure fallbacks using Topics or Actions.
- Test and iterate often: Use transcripts and analytics to refine trigger phrases and improve responses.
Wrapping up
Creating an agent in Copilot Studio is all about combining clear intent with smart structure. With solid system instructions, well-organized content, and thoughtful testing, your agent can become a reliable guide for users — answering questions, solving problems, and representing your brand with clarity and confidence.