
Build your first app with the V-I-B-E framework

Building

Now that you understand what vibe coding is, it’s time to start turning your idea into something buildable. This step is all about structuring what’s in your head so that an AI can help you build it—without needing to know how to code. You’ll use a conversational AI (like ChatGPT or Claude) to help you clarify your idea, break it down into parts, and shape it into prompts that work in vibe coding tools like v0 or Replit.
What you'll learn :
- What is the V-I-B-E framework?
- How to work with an LLM to structure your app idea and prompts
- Use the prompts with Replit to create a To-do-list app
- Best practices and considerations for effective VIBE coding
Subscribe now to unlock the full article and gain unlimited access to all premium content.
SubscribeNow that you understand what vibe coding is, it’s time to start turning your idea into something buildable. This step is all about structuring what’s in your head so that an AI can help you build it—without needing to know how to code. You’ll use a conversational AI (like ChatGPT or Claude) to help you clarify your idea, break it down into parts, and shape it into prompts that work in vibe coding tools like v0 or Replit.
What you'll learn :
- What is the V-I-B-E framework?
- How to work with an LLM to structure your app idea and prompts
- Use the prompts with Replit to create a To-do-list app
- Best practices and considerations for effective VIBE coding
Why Structuring Your Idea Is Important
AI can only help you if it knows what you want. If your idea is too vague, you’ll get vague results.
Think of your idea like decorating a room. If you say, “Make it nice,” the designer has no direction. But if you say, “I want a cozy reading nook with warm lighting and a place for books,” now they can build something you’ll actually love.
By structuring your idea first, you:
- Gain clarity on what you’re actually building
- Break the idea into small, buildable pieces
- Give better instructions to the AI
- Avoid spinning in circles once you start building
To do this well, we’ll use the V-I-B-E framework.
Introducing the V-I-B-E Framework
To make your idea easier to build, we’ll use the V-I-B-E framework. This is a simple step-by-step way to organize your app idea—starting from your vision and ending with a connected flow of screens. What’s powerful is that you’ll walk through each part of this framework with the help of an LLM like ChatGPT or Claude.
The LLM helps you structure your idea, clarify what matters, and shape your thoughts into natural language prompts you can paste directly into a vibe coding tool like v0 or Lovable. For non-technical builders, this approach bridges the gap between concept and code-free creation.

At each step, you’ll ask the LLM specific questions, get helpful responses, and translate those into prompts you can use with your vibe coding tool. Let’s walk through the process using a sample idea: a team to-do list app.
Building a To-Do List App
To make this guide actionable, we’ll walk through a real example: building a team to-do list app using Replit as our vibe coding tool. Before we jump into Replit, we’ll use Claude to help us clarify and structure the idea. You can use any LLM like ChatGPT or Gemini.
This process will show you how to take a simple concept, use an LLM to shape it using the V-I-B-E framework, and generate specific prompts you can use to start building in your vibe coding tool.
Step 1: V — Vision
Write your idea in plain language. Don’t worry about polish—just describe what you want to build and give the LLM the context of where you want to build it. It is always useful to have the LLM ask you questions about your idea, to help structure it and create prompts for Lovable.
Example LLM Prompt :
I want to build a simple team to-do list app that helps me stay organized. I want to use Replit to build it. Help me structure the idea, define and prioritize key features first and then come up with prompts for Replit. Ask me questions that will be useful to structure the idea.
LLM response:

The LLM responds with a structured set of questions that will help you frame the idea better and decide upon which features are important to you.
Your Followup Prompt:
“I would like the app to be simple, with a friendly UI. Primary objective is for the team to have a shared task-list that updates in real-time as members make changes. Its for all team members including leaders and PMs, about 6-8 people. The app should be accessible through the browser and mobile. No communication features needed, but it would be cool have notifications sent on email if changes were made to the tasks by a team member. Simple and straightforward, but modular so we can add features in the future. Design should be sleek, warm and colorful. Need it built in a couple of weeks.”
LLM response:


Step 2: I — Isolate
Now that the LLM has structured your features at a high level, in the next step you can start prioritizing core features for the first build. You’ll identify what’s essential for an MVP (Minimum Viable Product) and what can be added later as enhancements.
This helps you:
- Focus on building only what matters first
- Avoid scope creep
- Stay aligned with your core value proposition
Let’s use the LLM to help us define and organize these pieces.
Your Followup prompt:
“I think i like the must-have prompts for the MVP, lets also add due dates and reminders to the MVP. Can you help me structure a prompt based on my choices so i can get started with Replit. Ensure that my core requirements and design preferences are communicated. “
LLM response:


Now you have a prompt to get started with Lovable. Lets try that out !
Step 3: B — Build
Now that you’ve clarified your idea and prioritized your features, it’s time to start building your app. We will use Replit for demonstrating the build
In this step, we’ll take what we’ve structured so far and begin prototyping the app’s core interaction. Specifically, we’ll take the prompt you generated in Step 2 and input it directly into Replit to start designing your To-do list app.
Copy the prompt to Replit chat window and click on start building

Replit then analyzes your requirements, builds and presents a plan and asks for your approval. The pre-planning step is unique to the Replit platform, you can iterate on the plan before you get started. If even suggests additional features that might be useful.
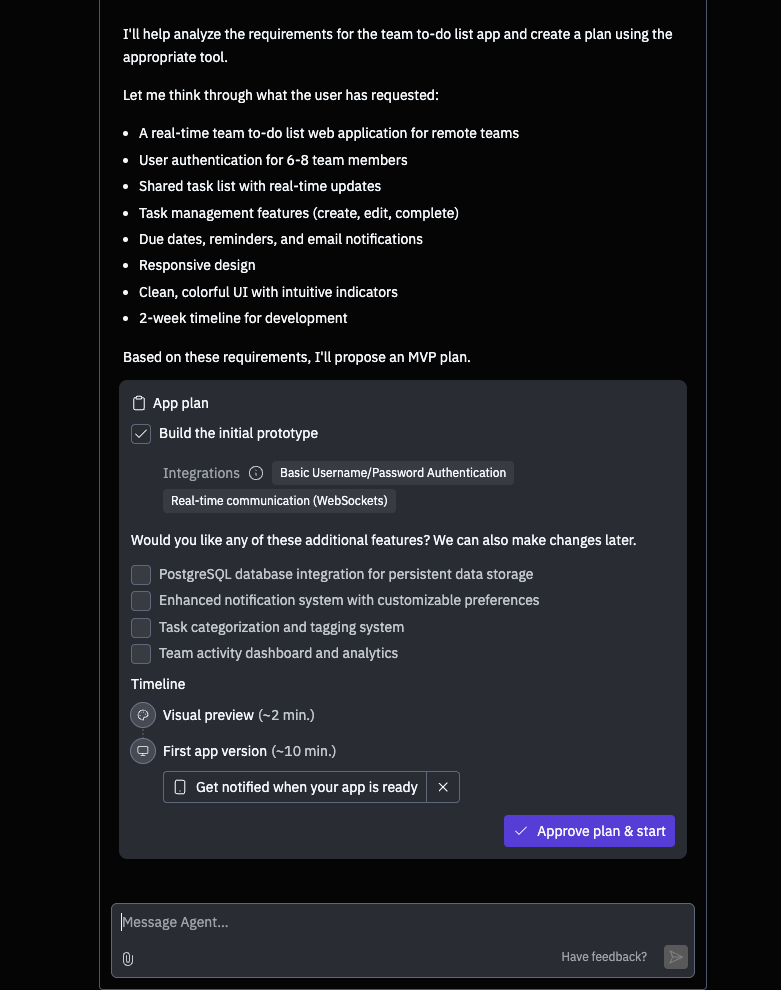
The PostgreSQL integration will be useful for persistent storage, so lets check that box and click on “Approve plan and start”. After a few minutes, We have a prototype with a login screen.

We clicked on the “Sign up” button, created a user login and we have a functional app where we can create tasks and assign to team members.

Next, we start evaluating the prototype and start fixing what doesn’t work.
Step 4: E — Evaluate
You’ve built your first screen in Replit—great! Now it’s time to step back and assess what you’ve got.
This phase is about evaluating the initial prototype and identifying what to improve. Vibe coding tools give you a fast starting point, but they usually need a few rounds of feedback to really match your intent.
First - Try out all the features and see what works and what doesn’t. In our case, there was a date picker issue while creating a new task. We took a screenshot of the error and pasted into the chat window, along with a basic description of where the error occurs.

The Replit agent then will proceed to troubleshoot the issue. It may take a few times for it to arrive at a solution. For best results, paste screenshots of any errors that you come across. After a few tries, the issue was fixed and we are able to create a task.

Next, click on every button in the UI and see if they work. In our case, All the buttons on the left were disabled and the filter on the top right didn’t work. Prompt the Agent in detail about fixing those issues.

It is important to remind the agent that it analyzes problems as whole and doesn’t attempt to fix them in isolation. This is especially useful when the agent gets stuck in a loop trying to fix and issue.
After a few iterations, the My tasks page worked ! However, the filter button still needs work, so lets add a task for it and remind the admin ;).

Considerations for Effective Vibe Coding
It is important to understand that Vibe coding is a very iterative process. Just like building software with code, you need to break down your idea into smaller parts, iterate over each while keeping the larger project context in light.
Methodical Thinking and Prompting
- As you structure your project with your favorite LLM, be methodical about breaking down the project into smaller parts.
- Once you have "Isolated" the components, approach building them systematically. For Ex- Front-end previews come first, then you have to start designing the logic for your user experience and the backend database or any other components needed.
- While iterating on smaller components, ensure that you remind the AI of the larger context whenever needed.
- Think in terms of Components and Frameworks - Check out our "Understanding the Anatomy of a coding project" guide
Troubleshooting and Debugging
- Debugging is like solving a puzzle, approach the problem methodically - Understand where the error might be happening, look at logs and any error messages you get. Use your LLM to decipher the error messages
- Provide contextual information to the agent to debug - Error codes, where you see the error visually, screenshots if possible
- Avoid being too broad with your prompts while troubleshooting a specific error. Focus the agent on the problem and error itself
- If the agent is stuck in a loop trying to troubleshoot a problem, consider reverting back to a previous checkpoint and start afresh with a different troubleshooting approach
- Be patient and stick with a methodical plan
Wrapping up
Vibe coding provides non-coders a very democratic way of building apps. However, it is a skill that needs to be practiced and learnt. Picking the right tool and learning how to communicate with it, is half the battle. The other half of the battle is structuring your project methodically and approaching it step-by-step. Have patience, research about frameworks/components and you'll be building full-stack apps in no time!
Now that you understand what vibe coding is, it’s time to start turning your idea into something buildable. This step is all about structuring what’s in your head so that an AI can help you build it—without needing to know how to code. You’ll use a conversational AI (like ChatGPT or Claude) to help you clarify your idea, break it down into parts, and shape it into prompts that work in vibe coding tools like v0 or Replit.
What you'll learn :
- What is the V-I-B-E framework?
- How to work with an LLM to structure your app idea and prompts
- Use the prompts with Replit to create a To-do-list app
- Best practices and considerations for effective VIBE coding
Why Structuring Your Idea Is Important
AI can only help you if it knows what you want. If your idea is too vague, you’ll get vague results.
Think of your idea like decorating a room. If you say, “Make it nice,” the designer has no direction. But if you say, “I want a cozy reading nook with warm lighting and a place for books,” now they can build something you’ll actually love.
By structuring your idea first, you:
- Gain clarity on what you’re actually building
- Break the idea into small, buildable pieces
- Give better instructions to the AI
- Avoid spinning in circles once you start building
To do this well, we’ll use the V-I-B-E framework.
Introducing the V-I-B-E Framework
To make your idea easier to build, we’ll use the V-I-B-E framework. This is a simple step-by-step way to organize your app idea—starting from your vision and ending with a connected flow of screens. What’s powerful is that you’ll walk through each part of this framework with the help of an LLM like ChatGPT or Claude.
The LLM helps you structure your idea, clarify what matters, and shape your thoughts into natural language prompts you can paste directly into a vibe coding tool like v0 or Lovable. For non-technical builders, this approach bridges the gap between concept and code-free creation.
At each step, you’ll ask the LLM specific questions, get helpful responses, and translate those into prompts you can use with your vibe coding tool. Let’s walk through the process using a sample idea: a team to-do list app.
Building a To-Do List App
To make this guide actionable, we’ll walk through a real example: building a team to-do list app using Replit as our vibe coding tool. Before we jump into Replit, we’ll use Claude to help us clarify and structure the idea. You can use any LLM like ChatGPT or Gemini.
This process will show you how to take a simple concept, use an LLM to shape it using the V-I-B-E framework, and generate specific prompts you can use to start building in your vibe coding tool.
Step 1: V — Vision
Write your idea in plain language. Don’t worry about polish—just describe what you want to build and give the LLM the context of where you want to build it. It is always useful to have the LLM ask you questions about your idea, to help structure it and create prompts for Lovable.
Example LLM Prompt :
I want to build a simple team to-do list app that helps me stay organized. I want to use Replit to build it. Help me structure the idea, define and prioritize key features first and then come up with prompts for Replit. Ask me questions that will be useful to structure the idea.
LLM response:
The LLM responds with a structured set of questions that will help you frame the idea better and decide upon which features are important to you.
Your Followup Prompt:
“I would like the app to be simple, with a friendly UI. Primary objective is for the team to have a shared task-list that updates in real-time as members make changes. Its for all team members including leaders and PMs, about 6-8 people. The app should be accessible through the browser and mobile. No communication features needed, but it would be cool have notifications sent on email if changes were made to the tasks by a team member. Simple and straightforward, but modular so we can add features in the future. Design should be sleek, warm and colorful. Need it built in a couple of weeks.”
LLM response:
Step 2: I — Isolate
Now that the LLM has structured your features at a high level, in the next step you can start prioritizing core features for the first build. You’ll identify what’s essential for an MVP (Minimum Viable Product) and what can be added later as enhancements.
This helps you:
- Focus on building only what matters first
- Avoid scope creep
- Stay aligned with your core value proposition
Let’s use the LLM to help us define and organize these pieces.
Your Followup prompt:
“I think i like the must-have prompts for the MVP, lets also add due dates and reminders to the MVP. Can you help me structure a prompt based on my choices so i can get started with Replit. Ensure that my core requirements and design preferences are communicated. “
LLM response:
Now you have a prompt to get started with Lovable. Lets try that out !
Step 3: B — Build
Now that you’ve clarified your idea and prioritized your features, it’s time to start building your app. We will use Replit for demonstrating the build
In this step, we’ll take what we’ve structured so far and begin prototyping the app’s core interaction. Specifically, we’ll take the prompt you generated in Step 2 and input it directly into Replit to start designing your To-do list app.
Copy the prompt to Replit chat window and click on start building
Replit then analyzes your requirements, builds and presents a plan and asks for your approval. The pre-planning step is unique to the Replit platform, you can iterate on the plan before you get started. If even suggests additional features that might be useful.
The PostgreSQL integration will be useful for persistent storage, so lets check that box and click on “Approve plan and start”. After a few minutes, We have a prototype with a login screen.
We clicked on the “Sign up” button, created a user login and we have a functional app where we can create tasks and assign to team members.
Next, we start evaluating the prototype and start fixing what doesn’t work.
Step 4: E — Evaluate
You’ve built your first screen in Replit—great! Now it’s time to step back and assess what you’ve got.
This phase is about evaluating the initial prototype and identifying what to improve. Vibe coding tools give you a fast starting point, but they usually need a few rounds of feedback to really match your intent.
First - Try out all the features and see what works and what doesn’t. In our case, there was a date picker issue while creating a new task. We took a screenshot of the error and pasted into the chat window, along with a basic description of where the error occurs.
The Replit agent then will proceed to troubleshoot the issue. It may take a few times for it to arrive at a solution. For best results, paste screenshots of any errors that you come across. After a few tries, the issue was fixed and we are able to create a task.
Next, click on every button in the UI and see if they work. In our case, All the buttons on the left were disabled and the filter on the top right didn’t work. Prompt the Agent in detail about fixing those issues.
It is important to remind the agent that it analyzes problems as whole and doesn’t attempt to fix them in isolation. This is especially useful when the agent gets stuck in a loop trying to fix and issue.
After a few iterations, the My tasks page worked ! However, the filter button still needs work, so lets add a task for it and remind the admin ;).
Considerations for Effective Vibe Coding
It is important to understand that Vibe coding is a very iterative process. Just like building software with code, you need to break down your idea into smaller parts, iterate over each while keeping the larger project context in light.
Methodical Thinking and Prompting
- As you structure your project with your favorite LLM, be methodical about breaking down the project into smaller parts.
- Once you have "Isolated" the components, approach building them systematically. For Ex- Front-end previews come first, then you have to start designing the logic for your user experience and the backend database or any other components needed.
- While iterating on smaller components, ensure that you remind the AI of the larger context whenever needed.
- Think in terms of Components and Frameworks - Check out our "Understanding the Anatomy of a coding project" guide
Troubleshooting and Debugging
- Debugging is like solving a puzzle, approach the problem methodically - Understand where the error might be happening, look at logs and any error messages you get. Use your LLM to decipher the error messages
- Provide contextual information to the agent to debug - Error codes, where you see the error visually, screenshots if possible
- Avoid being too broad with your prompts while troubleshooting a specific error. Focus the agent on the problem and error itself
- If the agent is stuck in a loop trying to troubleshoot a problem, consider reverting back to a previous checkpoint and start afresh with a different troubleshooting approach
- Be patient and stick with a methodical plan
Wrapping up
Vibe coding provides non-coders a very democratic way of building apps. However, it is a skill that needs to be practiced and learnt. Picking the right tool and learning how to communicate with it, is half the battle. The other half of the battle is structuring your project methodically and approaching it step-by-step. Have patience, research about frameworks/components and you'll be building full-stack apps in no time!