
How to Set Up a Crypto Wallet and your Web3 Identity

Foundational

In the decentralized world of Web3, a crypto wallet is essential for managing digital assets, interacting with decentralized applications (dApps), and establishing a unique digital identity. MetaMask is one of the most popular non-custodial wallets for Ethereum and Ethereum-compatible networks. This guide will take you through the step-by-step process of setting up MetaMask and registering an ENS (.eth) domain to personalize your Web3 presence.
What You'll Learn
- How to install and set up a MetaMask wallet.
- Best practices for securing your wallet and private keys.
- How to register a personalized ENS (.eth) domain.
Subscribe now to unlock the full article and gain unlimited access to all premium content.
SubscribeIn the decentralized world of Web3, a crypto wallet is essential for managing digital assets, interacting with decentralized applications (dApps), and establishing a unique digital identity. MetaMask is one of the most popular non-custodial wallets for Ethereum and Ethereum-compatible networks. This guide will take you through the step-by-step process of setting up MetaMask and registering an ENS (.eth) domain to personalize your Web3 presence.
What You'll Learn
- How to install and set up a MetaMask wallet.
- Best practices for securing your wallet and private keys.
- How to register a personalized ENS (.eth) domain.
Understanding Crypto Wallets
Crypto wallets are digital tools that allow you to store, manage, and transact with cryptocurrencies. They come in various forms, each serving different needs based on security and accessibility requirements.
Types of Crypto Wallets
- Custodial vs. Non-Custodial Wallets
- Custodial Wallets: Managed by third-party services like exchanges (e.g., Binance, Coinbase). These wallets are ideal for beginners who prioritize convenience over full control. However, you do not own the private keys, meaning you rely on the service provider's security measures.
- Non-Custodial Wallets: These give you full control over your private keys, ensuring that only you can access and manage your funds. They provide enhanced security and autonomy, making them a preferred choice for users who prioritize decentralization and financial sovereignty.
- Hot vs. Cold Wallets
- Hot Wallets: These wallets are connected to the internet, making them convenient for frequent transactions and interactions with dApps. Examples include MetaMask, Phantom, and Trust Wallet. However, their online nature makes them more vulnerable to hacking and phishing attacks.
- Cold Wallets: These wallets are offline and provide enhanced security for storing large amounts of cryptocurrency. Hardware wallets like Ledger and Trezor fall into this category. They are best suited for long-term investors who prioritize security over convenience.
- Software vs. Hardware Wallets
- Software Wallets: Digital applications such as MetaMask, Phantom, and Coinbase Wallet offer easy online access to your funds. These wallets are user-friendly and ideal for individuals engaging in DeFi, NFTs, and Web3 applications.
- Hardware Wallets: These physical devices store private keys offline, significantly reducing the risk of online threats. They are the gold standard for securing large crypto holdings, providing an extra layer of security for serious investors.
Choosing the right wallet depends on your usage. If you frequently interact with DeFi platforms or NFTs, a hot wallet like MetaMask is a convenient choice. For long-term storage of assets, a hardware wallet offers superior security.
Setting Up MetaMask
Step 1: Install MetaMask
For Desktop Browsers:
- Open your web browser and visit the official MetaMask website: https://metamask.io/.

- Click on "Get Metamask" and select the appropriate platform : iOS, Android or Chrome. For this guide, we will install the chrome extension. Click on "Install Metamask for Chrome" and follow the prompts to install the extension to your browser.

Step 2: Create a New Wallet
- Once installed, click on the MetaMask extension icon to open it. You will arrive at the following screen. Select to Agree to the terms of service and click on "Create New Wallet"
- Choose whether to opt-in for usage data sharing (you can decline this if you prefer privacy).

- Set up a strong password for accessing your wallet.

Step 3: Secure Your Wallet
- MetaMask will generate a Secret Recovery Phrase (12 words).

- Click Reveal Secret Recovery Phrase and write it down securely.

- Store the phrase in a safe location offline (e.g., a piece of paper or a password manager). Do not share this with anyone. If you lose access to your wallet, this is the only way to recover it.
- Confirm your Secret Recovery Phrase by selecting the words in the correct order.

- Click Confirm to proceed.
Step 4: Finalizing Your Setup
- After confirmation, click All Done.. Your MetaMask wallet is now ready! You can access it via the extension in your browser or the mobile app.

- Fund Your Wallet: To start using your wallet, you’ll need some ETH. You can buy ETH directly within MetaMask or transfer it from another wallet or exchange like Coinbase or Binance.
Securing Your Web3 Identity: Registering an ENS (.eth) Domain
ENS (Ethereum Name Service) allows you to replace your long, complex Ethereum wallet address with a simple, human-readable .eth domain. Instead of sharing a long hexadecimal string, you can use a domain like yourname.eth to send and receive cryptocurrency, interact with dApps, and establish a recognizable identity in the decentralized space.
Use Cases of ENS Domains
- Simplified Transactions: Instead of copying and pasting wallet addresses, users can send funds to yourname.eth.
- Decentralized Identity: Your ENS domain can act as your Web3 username, linking to your wallet, social profiles, and decentralized websites.
- Interoperability: ENS domains work across multiple dApps, wallets, and blockchains, improving ease of use within the ecosystem.
- Hosting Websites: You can link your ENS domain to decentralized websites hosted on IPFS or Arweave.
Step 1: Access ENS
- Open your browser and visit the ENS Manager App: https://app.ens.domains/.

- Click Connect Wallet and select MetaMask. Click connect and approve the transaction.

Step 2: Search for a Domain Name
- In the ENS search bar, enter your desired .eth name.

- If the name is available, select it and click Register.
Step 3: Complete Registration
- Choose the registration duration (minimum 1 year). Select "Use as primary Name" and click 'Next'.

- You can create a user Profile for your wallet or skip to the next step. The user profile is your public user identity associated with your wallet.

- Click begin and wait for the confirmation period.
- Click Register and confirm the final transaction. Once the waiting period is over, your ENS domain will be linked to your wallet !

Pro Tips
- Backup Your Recovery Phrase: Store it securely offline to prevent loss.
- Use a Hardware Wallet: For extra security, link your MetaMask wallet to a hardware wallet like Ledger or Trezor.
- Stay Alert to Phishing Scams: Never share your recovery phrase with anyone, and always verify URLs before entering your wallet details.
Wrapping Up
Now that you have a fully functional MetaMask wallet and an ENS domain, you're ready to explore Web3! You can use your wallet for decentralized finance (DeFi), NFTs, gaming, and more. As the decentralized internet continues to evolve, your Web3 identity will play a crucial role in your digital interactions.
In the decentralized world of Web3, a crypto wallet is essential for managing digital assets, interacting with decentralized applications (dApps), and establishing a unique digital identity. MetaMask is one of the most popular non-custodial wallets for Ethereum and Ethereum-compatible networks. This guide will take you through the step-by-step process of setting up MetaMask and registering an ENS (.eth) domain to personalize your Web3 presence.
What You'll Learn
- How to install and set up a MetaMask wallet.
- Best practices for securing your wallet and private keys.
- How to register a personalized ENS (.eth) domain.
Understanding Crypto Wallets
Crypto wallets are digital tools that allow you to store, manage, and transact with cryptocurrencies. They come in various forms, each serving different needs based on security and accessibility requirements.
Types of Crypto Wallets
- Custodial vs. Non-Custodial Wallets
- Custodial Wallets: Managed by third-party services like exchanges (e.g., Binance, Coinbase). These wallets are ideal for beginners who prioritize convenience over full control. However, you do not own the private keys, meaning you rely on the service provider's security measures.
- Non-Custodial Wallets: These give you full control over your private keys, ensuring that only you can access and manage your funds. They provide enhanced security and autonomy, making them a preferred choice for users who prioritize decentralization and financial sovereignty.
- Hot vs. Cold Wallets
- Hot Wallets: These wallets are connected to the internet, making them convenient for frequent transactions and interactions with dApps. Examples include MetaMask, Phantom, and Trust Wallet. However, their online nature makes them more vulnerable to hacking and phishing attacks.
- Cold Wallets: These wallets are offline and provide enhanced security for storing large amounts of cryptocurrency. Hardware wallets like Ledger and Trezor fall into this category. They are best suited for long-term investors who prioritize security over convenience.
- Software vs. Hardware Wallets
- Software Wallets: Digital applications such as MetaMask, Phantom, and Coinbase Wallet offer easy online access to your funds. These wallets are user-friendly and ideal for individuals engaging in DeFi, NFTs, and Web3 applications.
- Hardware Wallets: These physical devices store private keys offline, significantly reducing the risk of online threats. They are the gold standard for securing large crypto holdings, providing an extra layer of security for serious investors.
Choosing the right wallet depends on your usage. If you frequently interact with DeFi platforms or NFTs, a hot wallet like MetaMask is a convenient choice. For long-term storage of assets, a hardware wallet offers superior security.
Setting Up MetaMask
Step 1: Install MetaMask
For Desktop Browsers:
- Open your web browser and visit the official MetaMask website: https://metamask.io/.
- Click on "Get Metamask" and select the appropriate platform : iOS, Android or Chrome. For this guide, we will install the chrome extension. Click on "Install Metamask for Chrome" and follow the prompts to install the extension to your browser.
Step 2: Create a New Wallet
- Once installed, click on the MetaMask extension icon to open it. You will arrive at the following screen. Select to Agree to the terms of service and click on "Create New Wallet"
- Choose whether to opt-in for usage data sharing (you can decline this if you prefer privacy).
- Set up a strong password for accessing your wallet.
Step 3: Secure Your Wallet
- MetaMask will generate a Secret Recovery Phrase (12 words).
- Click Reveal Secret Recovery Phrase and write it down securely.
- Store the phrase in a safe location offline (e.g., a piece of paper or a password manager). Do not share this with anyone. If you lose access to your wallet, this is the only way to recover it.
- Confirm your Secret Recovery Phrase by selecting the words in the correct order.
- Click Confirm to proceed.
Step 4: Finalizing Your Setup
- After confirmation, click All Done.. Your MetaMask wallet is now ready! You can access it via the extension in your browser or the mobile app.
- Fund Your Wallet: To start using your wallet, you’ll need some ETH. You can buy ETH directly within MetaMask or transfer it from another wallet or exchange like Coinbase or Binance.
Securing Your Web3 Identity: Registering an ENS (.eth) Domain
ENS (Ethereum Name Service) allows you to replace your long, complex Ethereum wallet address with a simple, human-readable .eth domain. Instead of sharing a long hexadecimal string, you can use a domain like yourname.eth to send and receive cryptocurrency, interact with dApps, and establish a recognizable identity in the decentralized space.
Use Cases of ENS Domains
- Simplified Transactions: Instead of copying and pasting wallet addresses, users can send funds to yourname.eth.
- Decentralized Identity: Your ENS domain can act as your Web3 username, linking to your wallet, social profiles, and decentralized websites.
- Interoperability: ENS domains work across multiple dApps, wallets, and blockchains, improving ease of use within the ecosystem.
- Hosting Websites: You can link your ENS domain to decentralized websites hosted on IPFS or Arweave.
Step 1: Access ENS
- Open your browser and visit the ENS Manager App: https://app.ens.domains/.
- Click Connect Wallet and select MetaMask. Click connect and approve the transaction.
Step 2: Search for a Domain Name
- In the ENS search bar, enter your desired .eth name.
- If the name is available, select it and click Register.
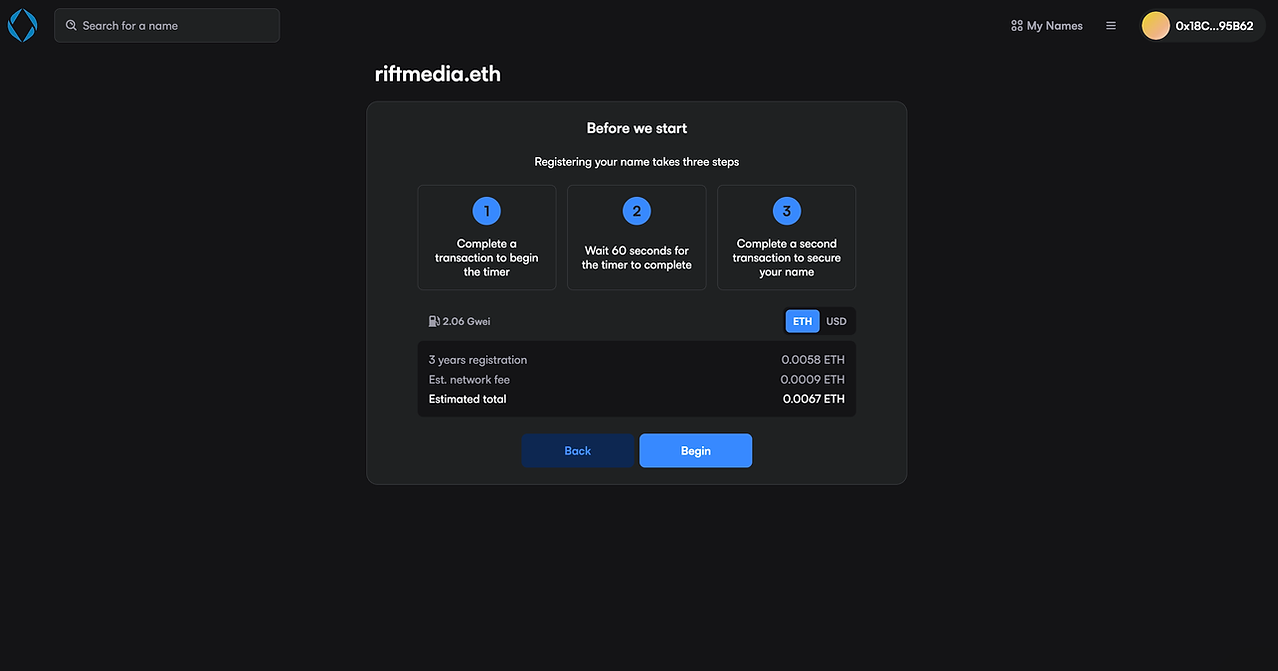
Step 3: Complete Registration
- Choose the registration duration (minimum 1 year). Select "Use as primary Name" and click 'Next'.
- You can create a user Profile for your wallet or skip to the next step. The user profile is your public user identity associated with your wallet.
- Click begin and wait for the confirmation period.
- Click Register and confirm the final transaction. Once the waiting period is over, your ENS domain will be linked to your wallet !
Pro Tips
- Backup Your Recovery Phrase: Store it securely offline to prevent loss.
- Use a Hardware Wallet: For extra security, link your MetaMask wallet to a hardware wallet like Ledger or Trezor.
- Stay Alert to Phishing Scams: Never share your recovery phrase with anyone, and always verify URLs before entering your wallet details.
Wrapping Up
Now that you have a fully functional MetaMask wallet and an ENS domain, you're ready to explore Web3! You can use your wallet for decentralized finance (DeFi), NFTs, gaming, and more. As the decentralized internet continues to evolve, your Web3 identity will play a crucial role in your digital interactions.